Saturday, July 3, 2010

roll in outer fleece

i tried this ages ago and it didntwork quite well (partly due to my reluctance to put pin on my sewing project). i learned about thistechnique from a forum-Diapersewingdivas. i've tried to find the link but not very successful but if i found it, i will post here. I dont have time to upload step by step so hopefully this will make sense for some who already have some basic nappy sewing skill


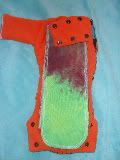
This is how the nappy looks on the wrong side. when u want the outer fleece to roll in, as u sew the legs u sew as picture above. u still sew normal seam allowance on the outer fleece but take a larger allowance on the inner layer microfleece. trim the excess microfleece when u are done.if u have a cotton outer and want the inner layer microfleece to roll out to prevent wicking u can do it the opposite way (a larger seam allowance on the outer layer fabric instead).

so when u flip it to the right side, this is how it looks (photo above).

The benefit of roll in outer fleece is to avoid wicking. and for sewing the roll in outer fleece this way, it gives your nappy a nicer finish. There's no excess microfleece gathering and less bulky.
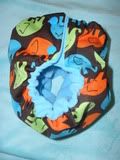
This is how i attach elastics on legs (sew the both ends only). photos below are without sewing elastic casing.


I made casing for the elastic just to see what the difference is. Because my pattern is trimmer i find that it's much better to have the casing. Bubblebub AIO doesnt have casing for the elastic. i guess it works fine because the nappy is much wider than my pattern and the material is heavier than mine.


i just found another lady who have a tutorial on this on flickr. it's called Camocotton on PUL here's the link . Her tutorial is on roll out inner fleece to avoid wicking if you are using cotton material on the outer layer.


Saturday, March 20, 2010

the most uncooperative model


Here's me trying to capture some photos of my new creation. However, i dont think my model is too happy to work today

here's a better shots:
ally's wearing a tie dye yoga pants and she's getting creative and wore her fairy dress as a top. she might not look like typical model u see in the magazine or catologue even look a bit silly but i am happy that she's wearing mummy's creation.


Wednesday, March 17, 2010

2 nappies out of 1 nappy cut

I always find cutting nappies in full size is a waste of fabric. This is a good way of using your scrap fabric as well of making full use of nice expensive fabric ie printed PUL and minky when u make nappies.


This is what i get fr a 50cm x 50cm printed PUL. TWO NAPPIES!!


Basically when i cut the pattern, just cut the body and cut the wings seperately. i use another fabric for the wings section. It only takes a little more time to stitch the wings to the body but it's worth it especially when you are using a more expensive fabric ie printed PUL or minky. Dont forget seam allowance where you will stitch the main body of the nappy to the wings.


Tips of the day:
Do u find it hard to sew stretchy fabric ie PUL. i cut interfacing and stabiliser (i've heard people using baking paper too) into strips and lay it on top of the PUL when I sew. it's much easier to sew and it wont stretch the PUL.

Good Luck and enjoy sewing!!


Monday, March 8, 2010

my new hobby- TIE DYE

This is my new hobby, cant get enough of it. just love to see the colourful swirl and excited to see the outcome of mix of colours on the fabric.


bamboo velour fabric. havent decided what i am going to do with them yet.


transformed the boring white prefold and "lampin" to a more colourful fabric.


gave old nappy and clothing a new look.

i mostly use the presoak method which is soaking the fabric or clothing in soda ash solution then squirt dye solution onto the fabric.